In-App Purchase (iOS & Android)
Offer extra content using in-app purchases directly within your app and publish your app to the Apple and Google App Store.
Only for mobile apps: This component only works for mobile apps published to Apple App Store and Google Play.
Prerequisites
Before setting up in-app purchases, you must have:
- A PandaSuite subscription plan that supports mobile app publishing (Single, Full, or Multi plan)
- Created your application on App Store Connect for iOS
- Created your application on Google Play Console for Android
Create in-app purchase
Each in-app purchase has a unique identifier associated with your application. This identifier must be created in App Store Connect and Google Play.
Testing in-app purchases: You can simulate purchases in PandaSuite Studio preview or PandaSuite Viewer for quick checks during development. For full end-to-end testing of the store flow, use TestFlight on iOS and an internal/closed track on Google Play.
App Store Connect
Go to App Store Connect and select your application. In the sidebar under In-App Purchases, click Manage.
Click on + to add an in-app purchase.
Choose the in-app purchase type:
- Consumable
- Non-consumable
- Subscription with automatic renewal
- Subscription without automatic renewal
and click Create. If you don’t know which one to choose, please refer to Apple’s in-app purchase documentation.
Add the reference name, product ID, and a localized display name. Product ID will be required in the In-App Purchase component.
Set the pricing from the list: 0.99 / 1.99 / 2.99 / 3.99 …
Provide in-app purchase information.
Click Save.
Play Developer
Go to Google Play Console, select your application and choose Monetization > Products > In-app products.
Learn more in the Google Play Billing documentation.
Click on Add new product and choose between: Managed Product / Unmanaged product / Subscription.
Fill in the Product ID field by clicking on the app. Choose the same as Apple. Product ID will be required in the In-App Purchase component.
⚠️ Be careful not to use uppercase letters for Product ID
On Google Play, only identifiers written entirely in lowercase letters and without special characters are allowed.
To avoid any compatibility issues when publishing your app on Android later, we recommend creating your in-app purchase identifiers directly in lowercase, even for the iOS version.
Select the pricing.
Component characteristics
Properties
- Product ID: The unique identifier for your in-app purchase, created in App Store Connect and Google Play Console
- Type: The type of in-app purchase (InApp for standard purchases, Subscription for subscriptions)
Exposed properties
The component exposes the following data that can be bound to other components:
- Price: The product price formatted with the user’s local currency (e.g., “$2.99”, “2,99 €”)
- Is paid: Boolean that switches to
trueas soon as the current user has an active purchase for the product - Is unpaid: Boolean that becomes
truewhile the user has not completed the purchase (always the inverse of Is paid)
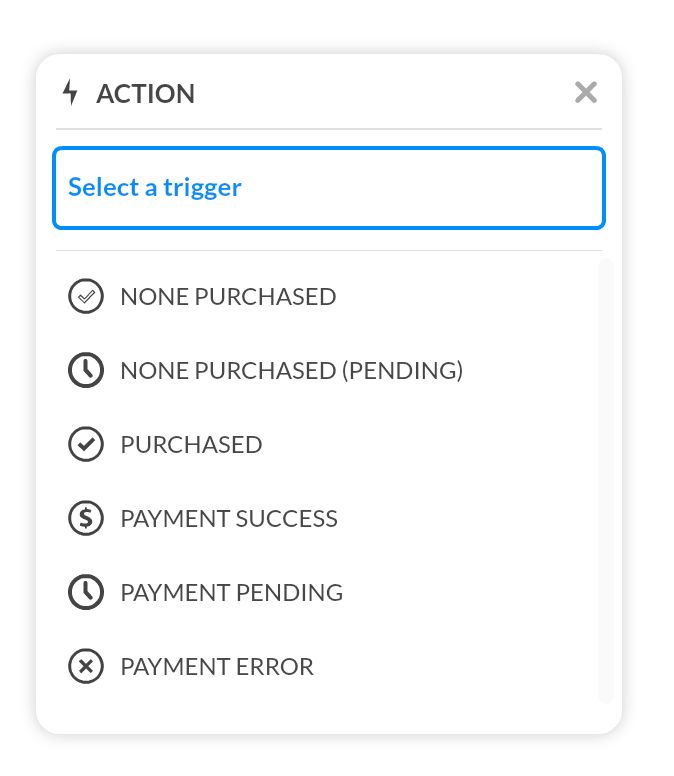
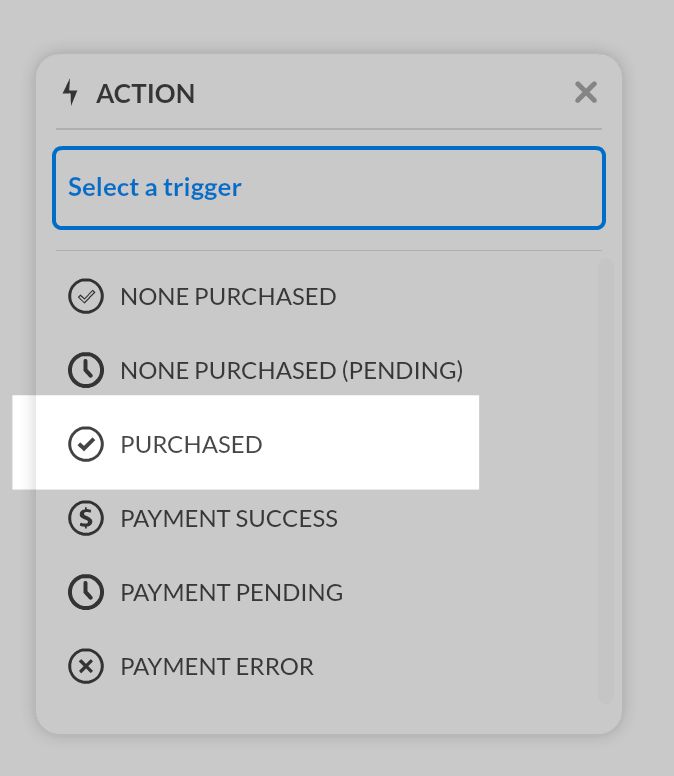
Triggers
- None purchased: The content has not been purchased (persistent state that reflects the current purchase status)
- None purchased (pending): The purchase is awaiting confirmation (Android only, for delayed payment methods like bank transfers)
- Purchased: The purchase is confirmed (persistent state that reflects the current purchase status)
- Payment success: A payment transaction just succeeded (one-time event triggered immediately after payment)
- Payment pending: The payment is being processed (Android only, for asynchronous payment methods that require approval)
- Payment error: A payment transaction failed (one-time event triggered when payment fails)
Actions
- Purchase: Initiates the in-app purchase flow
- Restore purchase: Restores previously purchased items (required for iOS App Review)
- Manage subscriptions: Opens the subscription management page
Implement in-app purchase experience
Add the In-App Purchase component
Design your screens for your in-app purchase flow.
Click Components and add the In-app Purchase component. This is a non-graphic component; it will only appear in the Objects list.
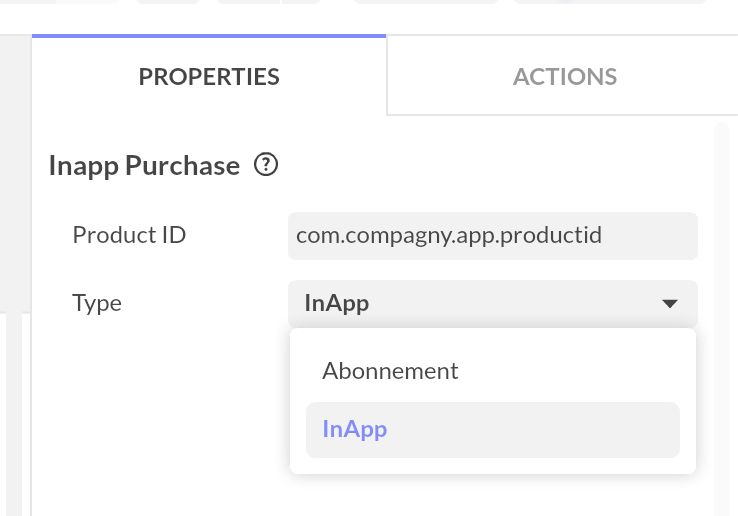
In the Properties panel, configure the following:
- Product ID: The unique identifier you created in App Store Connect and Play Developer Console
- Type: Select the type that matches your in-app purchase configuration:
- InApp (default) - For consumable and non-consumable in-app purchases
- Subscription - For auto-renewable subscriptions
Best practice: Add the In-App Purchase component at the project level (not within a specific screen). This ensures the component is always loaded and the purchase state is available across all screens, regardless of where the user navigates in your app.
Trigger the purchase
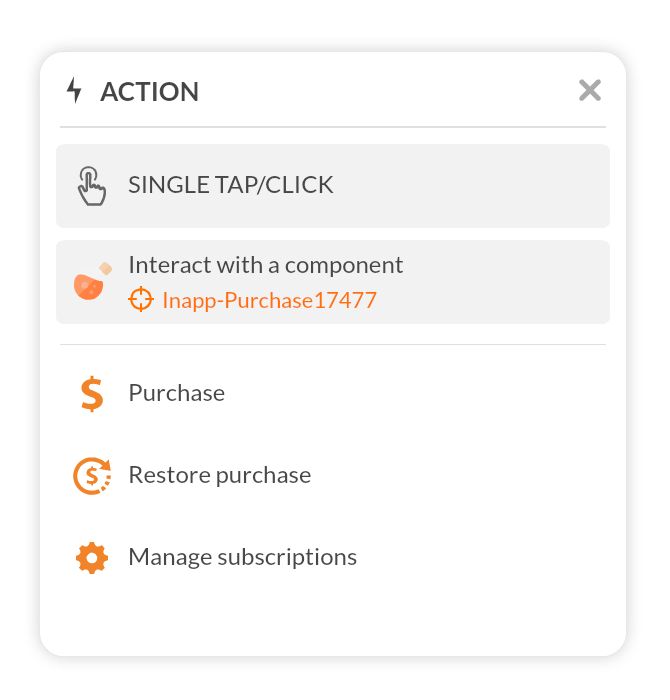
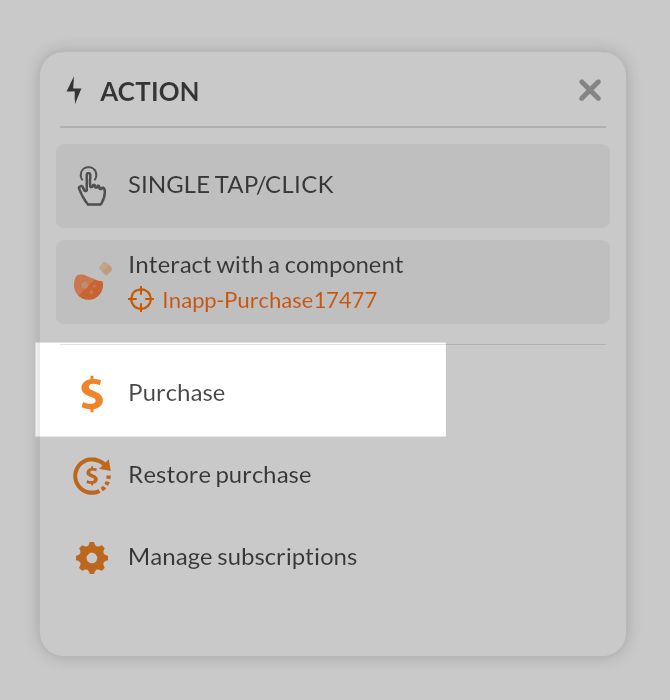
Select the button or interactive element that will trigger the purchase and open the Interactivity panel.
Choose Single Tap and the action Interact with a component. Select the In-App Purchase component and choose the Purchase action.
Unlock content after purchase
Select the In-app Purchase component and open the Interactivity panel.
Choose the Purchased trigger and create an action to unlock your premium content (e.g., Go to a screen, Open a pop-up).
You can also use the Payment success and Payment error triggers to display feedback messages to the user.
Display the localized price
To display the product price in your app:
- Add a Text component where you want to show the price
- Select the text component and open the Properties panel
- Click the Data binding icon next to the Text property
- Select your In-App Purchase component as the data source
- Choose Price from the available properties
The price will automatically update once the product information is loaded from the store.
Control content visibility with purchase status
Use the exposed booleans to hide or replace UI based on the purchase status:
- Group every premium element inside the same parent component (Group, Container, state, or Pop-up) so you only toggle one property
- Select that parent component, open the Properties panel, and set Visibility to Hidden so non-buyers do not see it by default
- Click the Data binding icon next to Visibility, pick your In-app Purchase component, and bind to the Is paid property
- (Optional) Bind the upsell banner or CTA to the Is unpaid property so it automatically appears for users who still need to buy
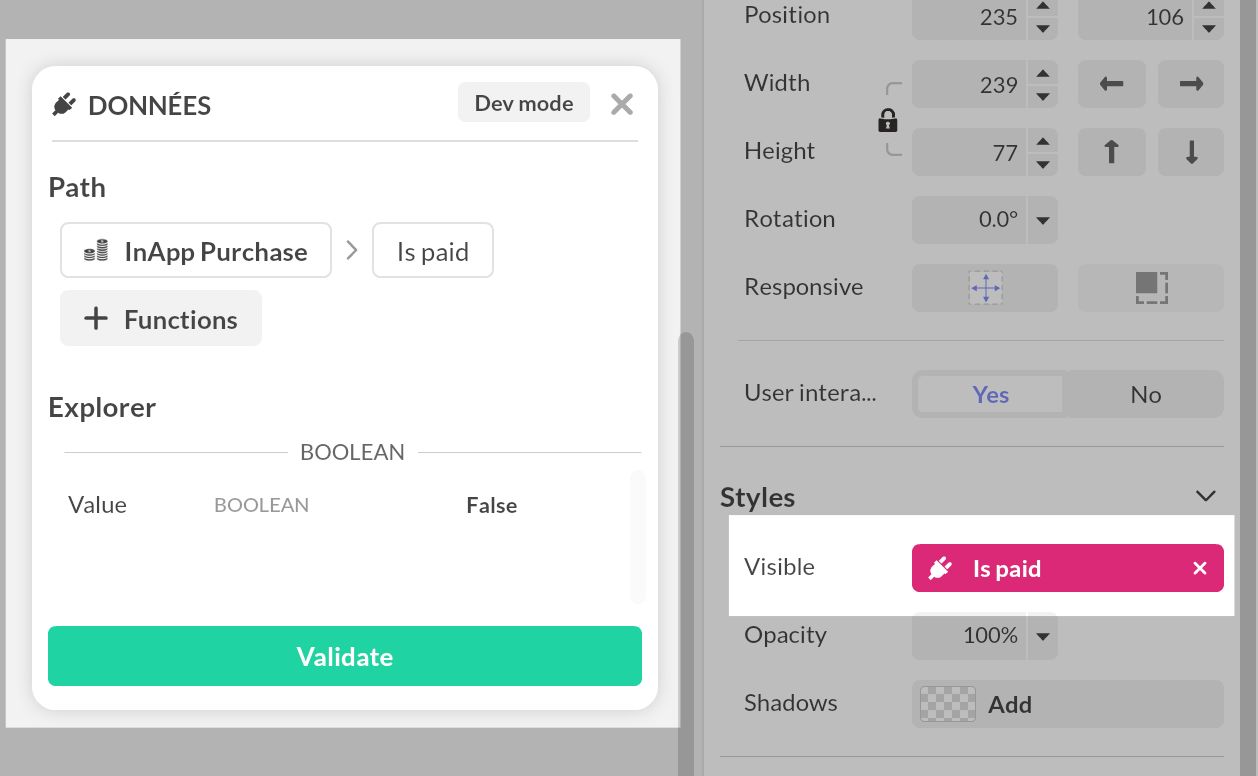
When you test the purchase or run the Purchased trigger, the bound component becomes visible as soon as the store reports the transaction. This approach also keeps the state after app relaunches because the component re-evaluates the boolean on load. Need a refresher on data binding? See Data binding.
Testing in-app purchases
Test with PandaSuite Viewer (simulation)
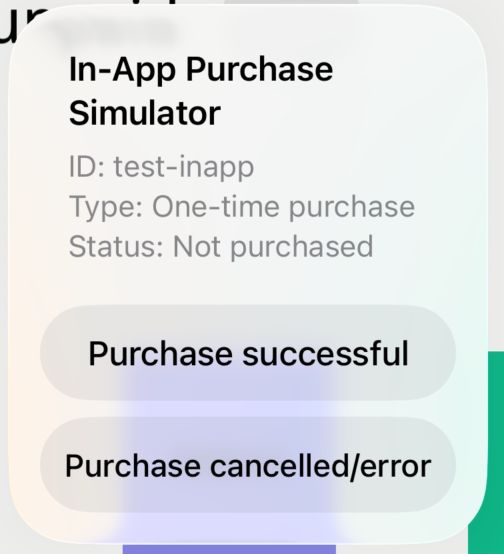
Use the built-in simulator to validate your UI and logic without connecting to the stores:
- Use the preview in PandaSuite Studio, or install the latest PandaSuite Viewer on your device (iOS/Android) or use the web Viewer.
- In your app, trigger the Purchase action as a user would.
- A simulation menu appears; choose an event to simulate (e.g., purchase success, error).
- Verify that your screens, conditions, and messages react as expected (unlock content, show feedback, etc.).
Simulation helps you iterate quickly on design and logic. You still need to test the real store flows on iOS and Android using the sections below. Purchases made in simulation are not real transactions.
Simulation events
The simulation menu mirrors the component triggers so you can validate each scenario:
- Payment success to confirm your success screens and the Purchased trigger
- Payment error to verify fallback messaging and keep the None purchased state
Each option immediately updates the exposed booleans (Is paid, Is unpaid) and the component triggers, so any data binding, screen states, or Condition component logic reacts just like it would in production. Trigger the Purchase action again whenever you want to reopen the menu and test another path, or to simulate a restored purchase using the real Restore purchase action.
iOS testing with TestFlight
Testing in-app purchases on iOS uses Apple’s Sandbox environment, which simulates the App Store without processing real payments.
Step 1: Create Sandbox testers in App Store Connect
- Go to App Store Connect
- Navigate to Users and Access > Sandbox
- Click + to add a new Sandbox Apple Account (Apple documentation)
- Enter a unique email address (must NOT be associated with any existing Apple ID)
- Set the App Store territory and create a password
You can create up to 10,000 Sandbox accounts. These accounts are only for testing and cannot access the real App Store.
Step 2: Configure the Sandbox account on your device
- On your iOS device, go to Settings > App Store
- Scroll down to Sandbox Account and sign in with your Sandbox credentials
- You do NOT need to sign out of your regular Apple ID
The Sandbox Account section only appears on devices with Developer Mode enabled or after installing a development build via Xcode or TestFlight.
Step 3: Upload your app to TestFlight
- Build and archive your app in Xcode
- Upload it to App Store Connect
- Add testers and distribute the build via TestFlight
Step 4: Test purchases
- Install the app from TestFlight
- Initiate an in-app purchase — the Sandbox environment handles the transaction
- Confirm with your Sandbox account password (or Face ID/Touch ID)
- Verify your app unlocks content correctly
Subscription renewals are accelerated in Sandbox: a 1-month subscription renews every 5 minutes, and a 1-year subscription renews every hour. This helps you test renewal scenarios quickly.
Manage Sandbox account settings
In App Store Connect under Users and Access > Sandbox, you can (Apple documentation):
- Clear purchase history — Reset all purchases to test the “non-purchased” state again
- Adjust subscription renewal rate — Control how fast subscriptions renew during testing
- Enable interrupted purchases — Simulate scenarios like payment method updates
Test both the Purchase and Restore purchase actions thoroughly. Apple requires a visible restore option for non-consumable purchases and subscriptions.
Android testing with Google Play
Testing in-app purchases on Android requires two separate configurations in Google Play Console: License testing (to avoid real charges) and an Internal testing track (to distribute your app to testers).
Step 1: Set up License testing (account level)
License testing allows specific Google accounts to make test purchases without being charged. This setting applies to all apps in your developer account (Google documentation).
- Go to Google Play Console
- Navigate to Settings > License testing
- Create an email list with your testers’ Google accounts (the same accounts they use on their test devices)
- Check the email list to enable it
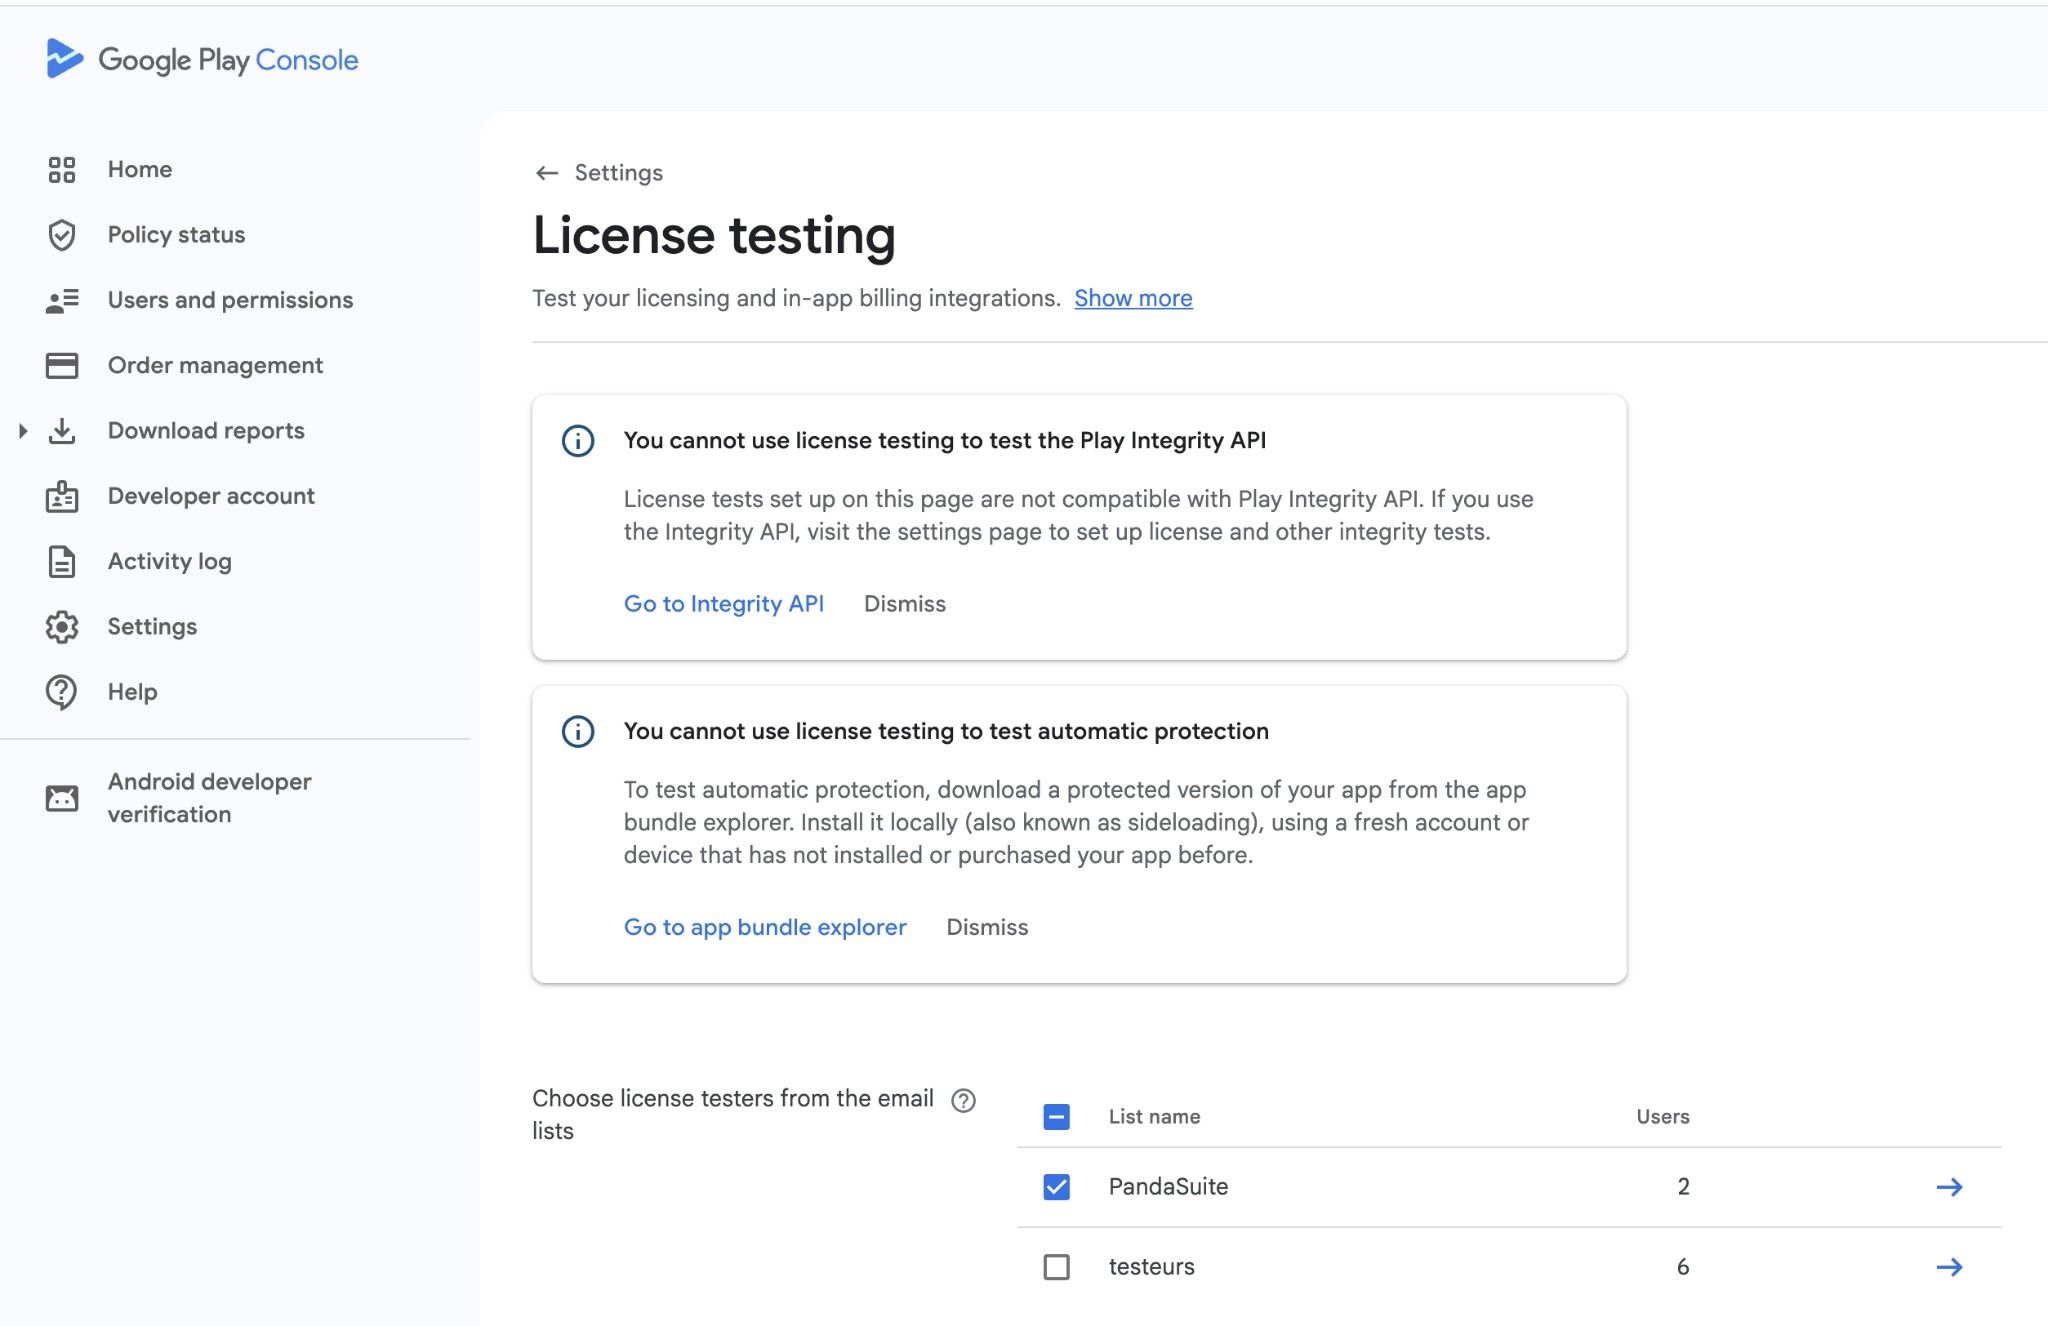
The tester’s device must be signed in with the exact Google account added to License testing. Otherwise, real charges will occur.
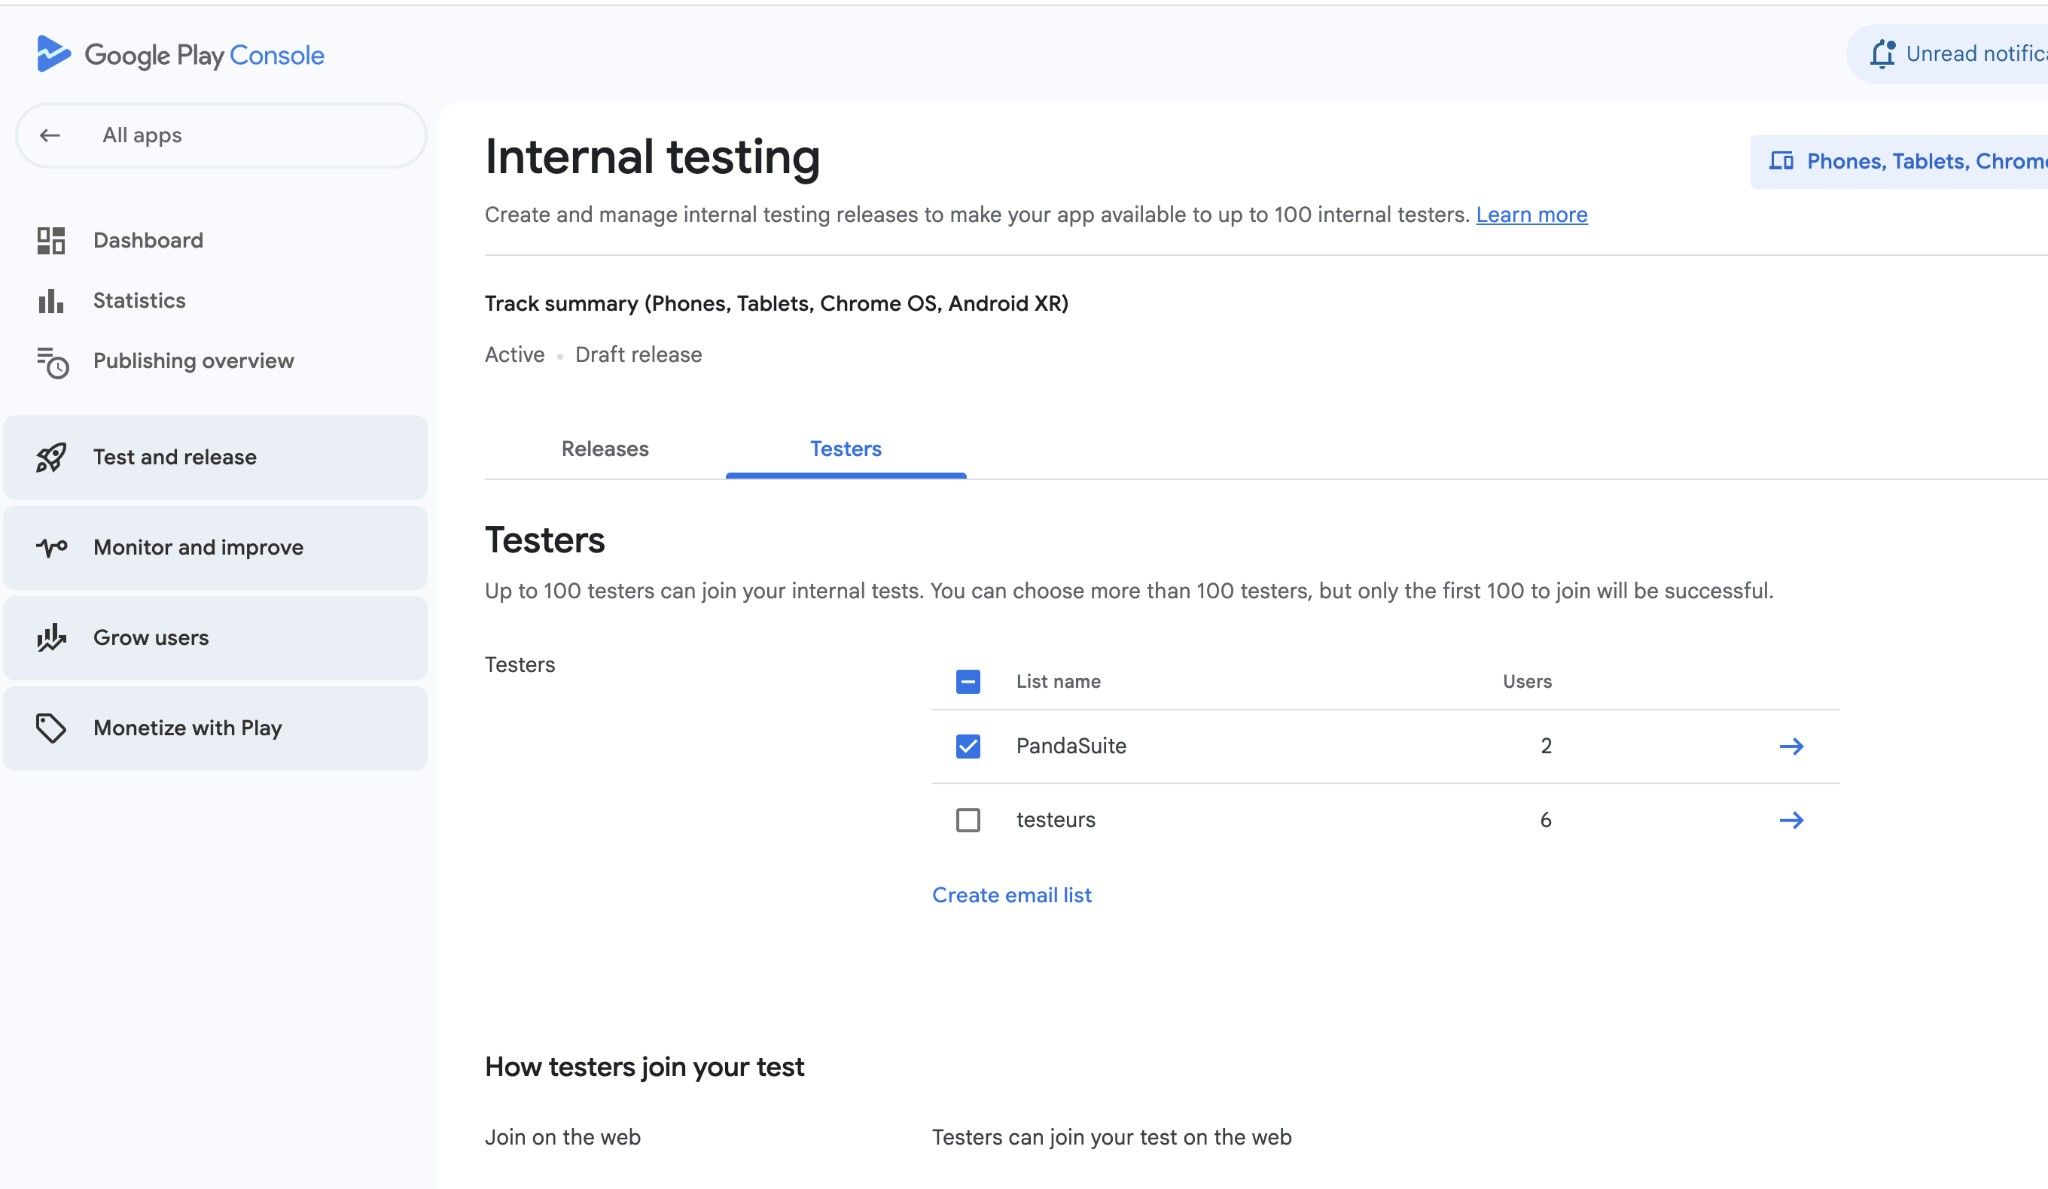
Step 2: Set up Internal testing (app level)
Internal testing lets you distribute your app to up to 100 testers who can install it directly from Google Play (Google documentation).
- In Play Console, select your app
- Go to Test and release > Internal testing
- Click the Testers tab
- Create an email list or select an existing one with your testers
- Upload a signed AAB file in the Releases tab and publish
Once published, share the opt-in URL with your testers. They must click the link and accept to become testers before they can install the app from Google Play.
Wait a few hours after creating new in-app products for them to propagate. Product information must be available before testing purchases.
Step 3: Test purchases
- Install the app from Google Play on the tester’s device (signed in with a License testing account)
- Initiate an in-app purchase in the app
- The Google Play payment dialog shows “Test order” - no real payment is processed
- Verify your app handles the purchase correctly
Test subscriptions have accelerated renewal periods in test mode (e.g., a monthly subscription renews every 5 minutes) to help you test renewal scenarios quickly.
Important testing scenarios
Test the following scenarios to ensure proper handling:
- Purchase flow: Complete a standard purchase successfully
- Restore purchases (iOS only): Test the restore functionality — required for App Store approval
- Already purchased: Try to purchase the same item again
- Cancelled purchase: Cancel during the payment flow
Troubleshooting
Use this checklist when the in-app purchase flow does not behave as expected on device, in TestFlight, or during App Review.
Tapping Purchase does not start the purchase flow on iOS
Check the following in this order:
- Confirm the Product ID in PandaSuite exactly matches the identifier created in App Store Connect
- Open Business > Contracts in App Store Connect and verify the paid apps agreement is active (Apple documentation, sign and update agreements)
- Complete any pending Tax, Banking, or account agreement steps in App Store Connect
- For a first subscription, make sure it is attached to the app version currently submitted for review (Apple documentation)
- Wait for App Store Connect changes to propagate before testing again
If the paid apps contract or related account agreements are missing, StoreKit can treat the product as unavailable even when your PandaSuite setup is correct.
The product is reported as invalid or unavailable
If your device logs mention an invalid product identifier, the issue is usually in the store configuration rather than in the PandaSuite component.
Verify:
- The same Product ID is used in PandaSuite, App Store Connect, and Google Play Console
- The identifier is written in lowercase to stay compatible across iOS and Android
- The in-app purchase metadata is fully saved in the store console and the product status is ready for submission or review (Apple documentation)
- The product belongs to the correct app and bundle ID
- You are testing a real store flow with TestFlight/Sandbox on iOS or an internal testing track on Google Play
The purchase sheet appears after a delay
Some delay can occur while the store loads product details, especially in sandbox environments. To reduce the perception of lag:
- Add the In-app Purchase component at the project level so it loads as early as possible
- Display a loading indicator or disabled state on the purchase button while the store connects
- Test on a real device because sandbox and TestFlight can be slower than production
The user closes the Apple or Google purchase sheet
Closing the payment sheet is a normal user action. Treat it as a cancelled purchase, not as a blocking error:
- Keep the premium content locked
- Let the user try again later
- Avoid showing an alarming error message if the only outcome is a user cancellation
Restore purchase does not unlock the content
Check that:
- The purchase was completed with the same Apple ID or Google account used for testing
- The product is non-consumable or a subscription
- A visible Restore purchase action exists in your app for iOS review
- Your premium screens react either to the Purchased trigger or to the Is paid exposed property